Google Tag Manager, or 'GTM' for the sake of the rest of this article, has become a fundamental part of our workflow at Extreme. Its numerous benefits aren't in the scope of this article, but for those new to using GTM, below is a summary of why we'd always recommend using it over the more traditional inline implementation.
- It brings teams closer together, particularly development and marketing. GTM ultimately provides marketers with access to implement code of their choosing onto a website. In the wrong hands, this can be very risky, so I always recommend that you use GTM as a means to help bridge the knowledge gap between your marketing and development teams.
- It improves efficiency. In most cases, there's usually a code deployment workflow in place to ensure that updates are fully tested, working etc; and for good reason. But, this sometimes means that getting the smallest update live onto a site can take several weeks. GTM reduces this timeframe and allows marketers to have their own deployment workflow (still factoring in what I mentioned in point one), which can mean we can get tags live quicker, resulting in more data being captured sooner. It also means that the development team can focus on what they do best, coding.
- Scalability. Something that you don't always consider until you have an endless list of tags that you need to maintain and add to. Using GTM means you can edit things in bulk, and scale your tracking requirements in line with your clients' business objectives.
So, now you know why you should be using GTM, here's how you can set up a base container that will work across multiple different environments.
FYI
This container works on the basis that you have a consistent naming convention for your staging sites. In this example, all our sites will sit on a subdomain of a specific staging domain that we use internally only, such as client.extreme-staging-sites.com. The markup in this container can easily be changed though to suit your specific requirements.
1. Define where the data should go
The first thing we do, is define where we're going to send our different environments data too. Depending on your preferences, you can either send your staging data to a 'Staging Property' within the businesses primary Google Analytics account, or alternatively, send it to a dedicated 'Staging Sites' account, with a property for each staging site. We're going with the latter option, as we don't always need clients to see the staging data for their account.
However you do it, grab the Tracking ID of your staging property, and keep it aside. Do the same for your live account's Tracking ID. Once you've done that, set up your Google Analytics views as you see fit.
2. Create a GTM account and container, then install it on your staging and production site.
I'll assume you know how to do this, but if you don't, here's a really good guide on how to get started. You only need one container for your site, even though you're potentially tracking different sites/subdomains.
3. Start signposting
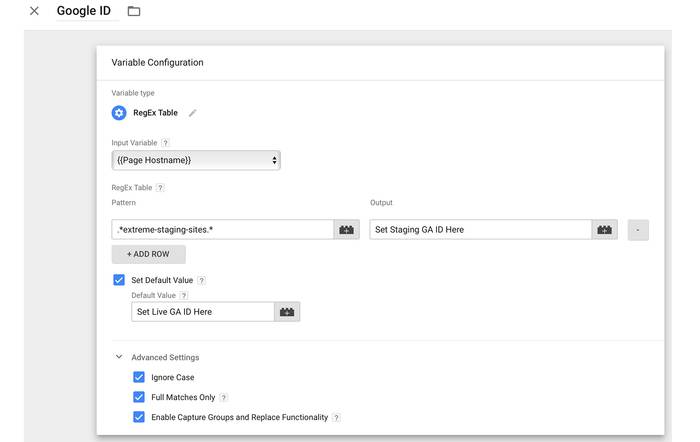
So this is the variable that defines which Google Analytics property we send the data to, based on the environment you're viewing. Follow the below steps to build your base Google Analytics tag:
- Name:
Google ID - Variable Type: RegEx Table
- Input Variable: Page Hostname
- Pattern:
.*extreme-staging-sites.*(change this domain for whatever your root domain is) - Output: Set your Google Analytics Tracking ID here, from your staging site's property.
- Tick 'Set Default Value'. In here, add the Google Analytics Tracking ID of your production website.
- Save this variable
So, what's this doing exactly? Let's break it down bit by bit.
Variable Type: We're using a variable type of RegEx Table because this offers us a lot more flexibility over the rules we're putting in place. You can tighten this up even more if you're comfortable with regex, but the above should cover most situations. You could also use a lookup table if you have absolute URL's, but you'd need to update this on a case by case basis which we wouldn't recommend. Using the RegEx table makes it a more scalable solution.
Input Variable: We're using page hostname, because it returns a string containing the hostname of the current page (i.e the root domain), without any protocols. This means it'll work across non-SSL and SSL secure pages.
Pattern: This is using some pretty basic regex, which says that if the domain contains 'extreme-staging-sites' in it, send any data to the value declared in the 'output' field. You can have anything before or after it and it'll still work.
Output: This is where we put the Google Analytics Tracking ID of our staging site. Combined with the regex set in the 'pattern' column, we're essentially saying that if the page hostname matches whatever is set in the pattern, use this value here.
Set Default Value: This is used to declare the Google Analytics Tracking ID of our live site. So if the pattern above returns false, it'll use this ID instead, which is what will happen on your production environment.
Make sense? Here is the process that the tag will go through when using this variable:
- If the trigger on the tag is accepted, the tag will look at the Google Analytics Setting value, which will be
{{Google ID}}. - This will then run through the following checks:
- Does the domain that has triggered the tag contain 'extreme-staging-sites'?
- If so, send the data to the Google Analytics Tracking ID for the staging site.
- If not, send it to the Google Analytics Tracking ID declared in the 'Set Default Value' section.
Quite simple really. It should look similar to the below when you've finished. Also, as mentioned, this can easily be tweaked to fit your specific requirements. See below...
Tweak to fit your setup
If you have your staging sites sit on the subdomain of the production site, such as staging.client-domain.com, you can simply change the regex pattern to look for an input variable of 'URL' and a pattern of 'staging' instead. This will check the entire URL, for anything that has staging in it.
Once you've built your variable, you can then build out your tags as you normally would - just make sure you tick the 'Enable overriding settings in this tag' on the Google Analytics section of each tag, and set it to use your new {{Google ID}} variable. This will then send any data to the right property, based on the url of your website.
If you're using multiple environments, you can just add an extra row into your regex table to factor in any extra domains you need to cater for.
Remember, you can also use this in conjunction with the environments setting within the Google Tag Manager interface; I.e only push tags to environment specific containers when you're ready.
Want to get your website's tracking in tip top condition?
Get In TouchPost by
Project